Framer's Corner
Instructions for Ready-to-Assemble Frames
Small size frames are typically shipped pre-joined. Medium to large sized frames are typically shipped ready to assemble to keep shipping costs low and to minimize risk of shipping damage. If you prefer to have your frame(s) shipped pre-joined, simply reply to your confirmation email letting us know and we will accommodate if feasible. Simply follow these steps to easily assemble your custom frame(s). No special tools required and results are guaranteed.
1. Lay the custom frame lengths face down on a flat surface.
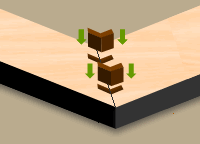
2. Apply a light coating of wood glue on the frame ends, then align each frame corner and insert the included thumbnail inserts into the routed slots. Lightly tapping in with a hammer if necessary.
3. Gently turn the frame over so it is lying flat on its back. Ensure corners are tight, wipe off any excess glue and allow it to set. For assembling heavy frames or framing very heavy objects, such as mirrors, reinforce the frame corners using steel angles that can be acquired from a local hardware store for a few dollars per set.


Framing Artwork with Plexiglass, Mat and Foam Board
For artwork that requires only plexiglass and foam core backing (no matting), follow these easy steps for a professional look:
1. Place your artwork on top of the foam core backing.
2. Place the plexiglass on top of your artwork.
3. Place the foam board, artwork and plexiglass into the cavity of the frame and secure with glazier points or turn buttons (see appropriate sections for illustrations).
For artwork that requires plexiglass, foam core backing and matting, follow these easy steps for a professional look:
1. Center your artwork on top of the foam core backing and keep centered using framer’s tape or mounting corners.
2. Place the plexiglass on top of your artwork.
3. Place the foam board, artwork, matting and plexiglass into the cavity of the frame and secure with glazier points or turn buttons (see appropriate sections for illustrations).


Securing Frame Contents
For securing frame contents that are recessed within the frame cavity, follow these easy steps:
1. With the frame facing down and all the contents loaded into the frame, take one glazier point and place the flat bottom side on the back of the foam board.
2. Push the pointed edge of the glazier point into the side wall of the frame (you may need to use a flat-head screwdriver if the wood is too hard).
3. Repeat with a glazier point positioned every 10 to 12 inches around the perimeter of the frame.
For securing frame contents that are flush (level) with the back of the frame, follow these easy steps:
1. With the frame facing down and all the contents loaded into the frame, take a turn button and place it on the frame edge such that the arm of the turn button hangs over the frame contents.
2. Insert a screw through the turn button hole and into the frame.
3. Repeat with a turn button positioned every 10 to 12 inches around the perimeter of the frame.
For securing stretcher bars (primarily used for oil paintings) that may protrude out of the frame cavity in the back, follow these easy steps:
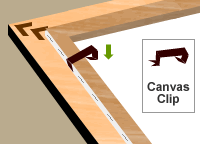
1. Gently insert double-pronged end of the canvas clip between wood frame and stretcher bar.
2. Firmly push the canvas clip into position over the stretcher bar.
3. Repeat on each side of the frame (larger frames may require more than one canvas clip per side).


Hanging Framed Artwork
For hanging small or narrow-sized framed artwork, follow these easy steps:
1. With the framed artwork facing down, secure a sawtooth hanger to the top center of the frame back.
2. Hang the frame by positioning the center notch over a nail or screw placed on the wall.
For hanging medium- to large-sized framed artwork, follow these easy steps:
1. With the framed artwork facing down, screw in a loophole hanger on either side of the frame, roughly 3/4 of the way up.
2. Thread both ends of the braided wire through each of the loophole hangers and wrap approximately 6" of each end of the wire over and around itself a minimum of five times.
3. Position the center of the arched-braided wire over a wall hanger and adjust until centered.


